Custom Billing Charges in Azure
Custom Billing Charges allow you to modify your Azure billing report charges and create unique discounts, credits, or premiums for your customers.
To access this feature, go to the left navigation pane and choose Cost > Azure Partner Tools > Configure > Custom Charges.
Type of Custom Charges and Use Cases
On the Azure Custom Charge page, click New Custom Charge to see the custom billing charge options.
Click the links to learn how to create these custom billing charges.
What Is It?
A percentage-based discount or premium you can apply in real-time to any subset of List costs within your subscription family.
Who Can See It?
Only you (payer). Your customers will not see or get any record of these charges.
| Action | Example (if applicable) | Option |
|---|---|---|
| Name | Type a name for this charge. This name is for reference only and will not appear on any invoices. |
NA |
| Percentage of discount or premium (negative if discount) | Type the percentage premium (positive number) or discount (negative number). | A discount of 50% would be -50 |
| Apply percentage to | Select if you want to apply the custom charge to Standard, List, or Retail cost.
|
NA |
| Apply to charges that match these values | Select one or more of the following parameters from your billing report and apply them to your custom billing charge: Subscription/Subscription Family, Region, Consumed Service, Category, Subcategory, Meter Name, Tags, or Cost Source. |
All accounts in the US Central region that used the Virtual Network consumed service |
| Start/End Date | Choose a start date (required). If you want the charges to continue indefinitely, do not choose an end date. If the start date is any date in the past, you will need to reload the billing report for the months where you want to apply the custom charge. |
December 1-31, 2017 |
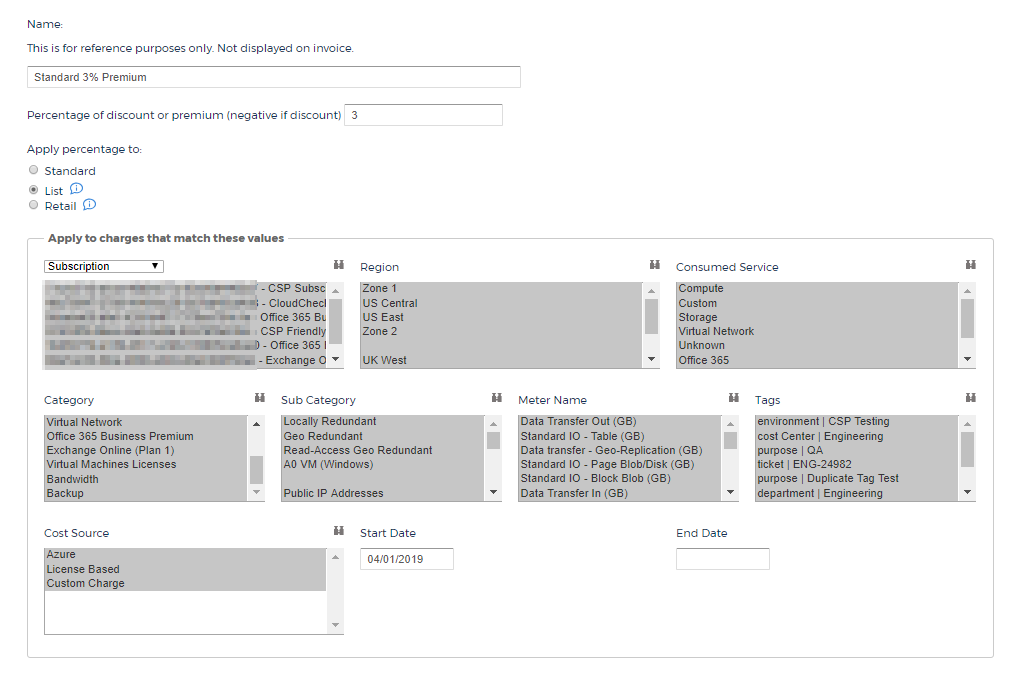
In this use case, the goal is to charge all your customers a 3% premium.
- For the name, type Standard 3% Premium
- For the percentage, type 3
- Apply the percentage to List cost.
- Type a start date and leave the end date blank.
- Click Save Custom Charge. CloudCheckr saves your charge and displays it in your list of custom billing charges.
Setup:
Result:

What Is It?
You can add a customer-visible custom charge that affects Azure accounts or services of your choice. CloudCheckr computes and adds the charge as a single line item in your customer's List cost data when the billing month is closed.
Who Can See It?
You and your customers will see the charge as a single line item under List cost.
| Action | Example (if applicable) | Option |
|---|---|---|
| Name | Type a name for this charge. This name is for reference only and will not appear on any invoices. |
NA |
| Description | Type a description for this charge. CloudCheckr will assign this description to your new charge's meter name. CloudCheckr can display the description on invoices. |
5% discount on Compute consumed services |
| Percentage of credit or charge (negative if credit) | Type the percentage premium (positive number) or charge (negative number). | A charge of 50% would be -50 |
| Create credit or charge tier (negative if credit) | Allows you to create tiered charges for your customers. Minimum charge: minimum charge you want to enforce Maximum charge: maximum charge you want to enforce Custom Charge Tiers:
Type the monetary limit and percentage for each tier. Click |
You can charge one or more accounts a 5% premium for their first $10,000 spend and a 3% premium on their spend from $10,000 and up. |
| Apply percentage to | Select if you want to apply the custom charge to Standard, List, or Retail cost.
|
NA |
| Apply to charges that match these values | Select one or more of the following parameters from your billing report and apply them to your custom billing charge: Subscription/Subscription Family, Region, Consumed Service, Category, Subcategory, Meter Name, Tags, or Cost Source. |
All accounts in the US Central region that used the Virtual Network service |
| Start/End Date | Choose a start date (required). If you want the charges to continue indefinitely, do not choose an end date. If the start date is any date in the past, you will need to reload the billing report for the months where you want to apply the custom charge. |
December 1-31, 2017 |
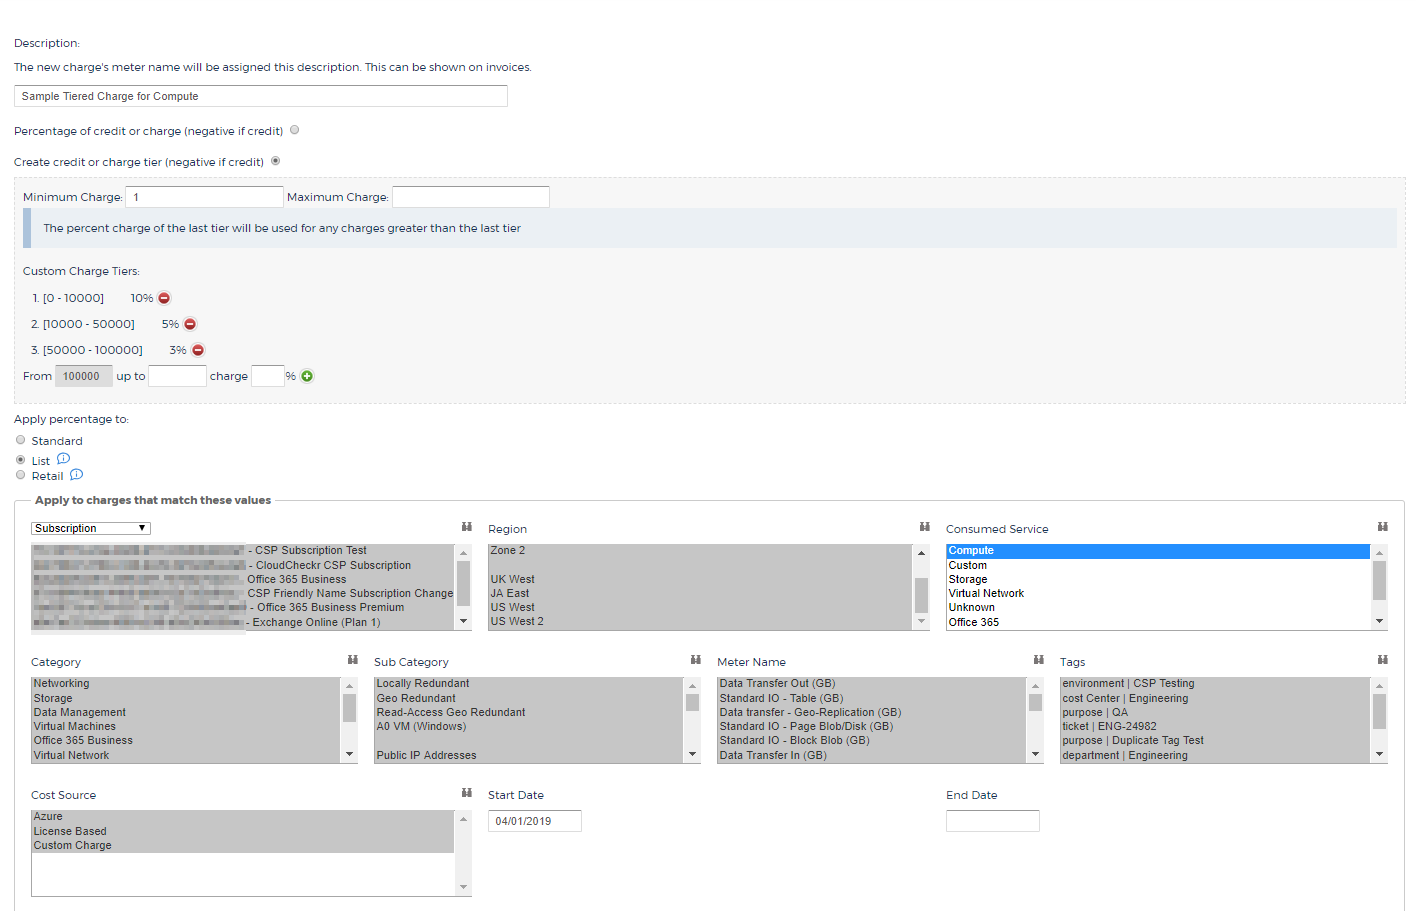
In this use case, the goal is to create a tiered charge for three accounts that go down in percentage the more the customer spends.
- For the description, type Sample Tiered Charge for Compute Consumed Services
- Select Create credit or charge tier (negative if credit). The tiered charges options display.
- For the minimum charge, type 1 and for the maximum charge, leave the field blank since we do not want a maximum.
- In the Custom Charge Tiers section, type 10000 in the first field and type 10 in the second field to create Tier 1: 0-10000 at 10%.
Click
 to add Tier 1.
 - Type 50000 in the first field and type 5 in the second field to create Tier 2: 10000-50000 at 5%.
Click
to add Tier 2. - Type 100000 in the first field and type 3 in the second field to create Tier 3: 50000-100000 at 3%.
Click
to add Tier 3.This is the last tier. Any charges more than $100,000 will continue to have a 3% charge. - Apply the percentage to List cost.
- In the Apply to charges that match these values section, select Subscription from the drop-down menu and select a subscription from the list.
- From the Consumed Service drop-down menu, select Compute.
- Type a start date and leave the end date blank.
- Click Save Custom Charge. CloudCheckr saves your charge and displays it in your list of custom billing charges.
Setup:
Result:

What Is It?
An additional single custom charge or credit with a specific monetary value you can apply as a one-time charge or recurring monthly charge or credit.
Who Can See It?
You and your customers will see the charge as a single line item under List cost.
| Option | Action | Example (if applicable) |
|---|---|---|
| Start/End Date | Choose a start date (required). If you want the charges to continue indefinitely, do not choose an end date. If the start date is any date in the past, you will need to reload the billing report for the months where you want to apply the custom charge. |
January 1-31, 2018 |
| Amount | Type a monetary value for the fixed charge or credit. | NA |
| One time/Monthly recurring | Select One time if you want CloudCheckr to apply this custom charge only once. Select Monthly recurring if you want CloudCheckr to apply this custom charge each month. |
NA |
| Name | Type a name for this charge. This name is for reference only and will not appear on any invoices. |
NA |
| Description | Type a description for this charge. CloudCheckr will assign this description to your new charge's meter name. CloudCheckr can display the description on invoices. |
Monthly Account Maintenance Charge |
| Apply to charges that match these values | Select the subscriptions that you want to receive this monthly charge. If you select multiple subscriptions, CloudCheckr will create a single charge for each subscription. | NA |
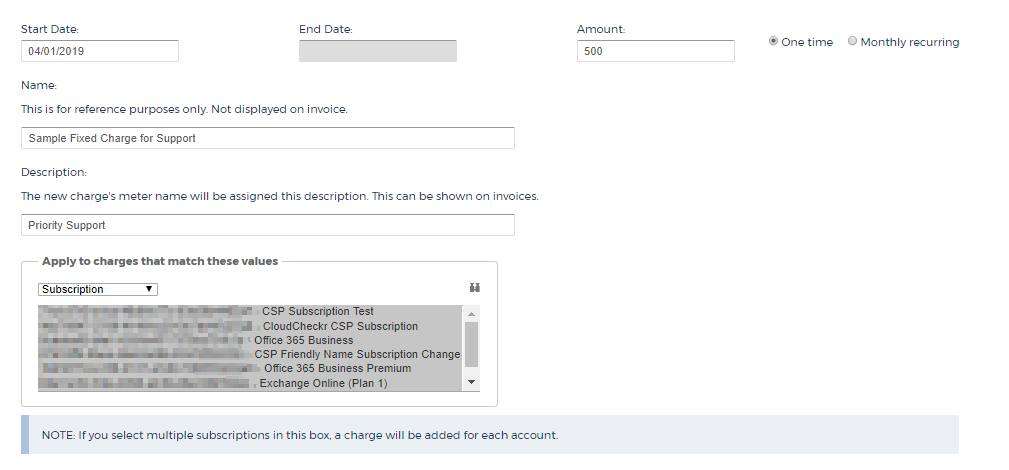
In this use case, the goal is to create a monthly recurring fixed charge of $500 for extra support provided to your customers.
- Type a start date and leave the end date blank.
- In the Amount field, type 500
- Select Monthly recurring.
- For the name, type Sample Fixed Charge for Support
- For the description, type Priority Support
- In the Apply to charges that match these values section, select the subscriptions where you want to apply this custom charge.
- Click Save Custom Charge. CloudCheckr saves your charge and displays it in your list of custom billing charges.
Setup:
Result:

Modify Your Custom Charges
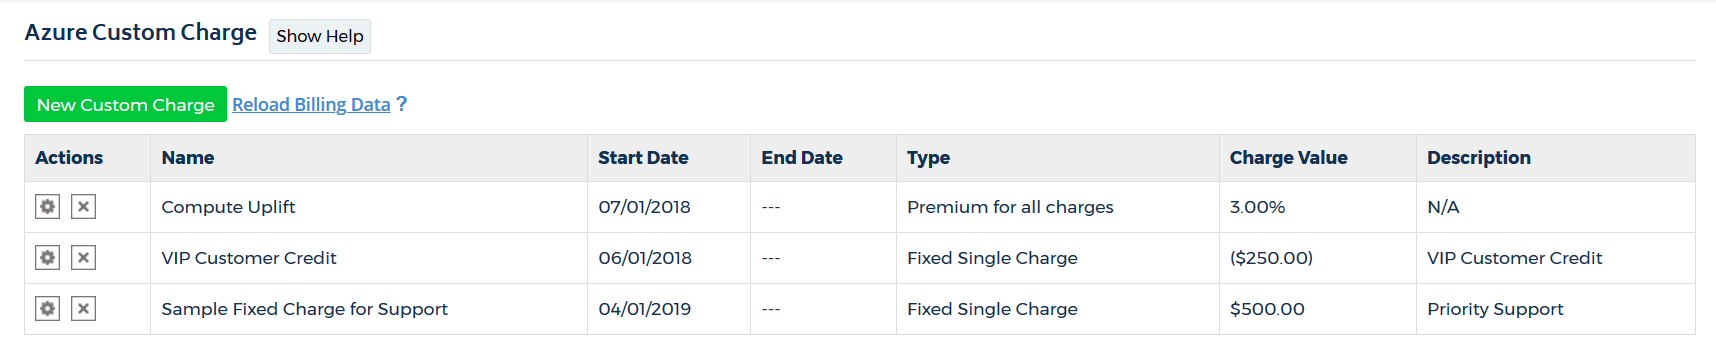
Once you save your custom charge, CloudCheckr will display a list with all your custom charges.
|
UI Component |
Description |
|
Edit icon |
Click to display the selected custom charge and modify it. |
|
Delete icon |
Click to delete the selected custom charge. A popup message will prompt you to verify your deletion. |
|
Name |
Identifies the name of the charge that you provided when you created the charge. |
|
Start Date |
Indicates the date when the software will begin to apply the custom charge. |
|
End Date |
Indicates the date when the software will stop applying the custom charge. |
|
Type |
Identifies the type of custom charge you configured: percent discount or premium; monthly percent or credit; or fixed charge or credit. |
|
Charge Value |
Identifies value of the custom charge as a percentage, whole number, or tier. |
|
Description |
Summarizes the purpose of the custom charge for easy identification. |
|
Reload Billing Data? |
If you modify your custom charges, you must reload your usage data for changes to take effect. Click the Reload Billing Data to open the Reload Usage Report page where you can reload your data. |