Cost Allocator
CloudCheckr’s Cost Allocator is a powerful tool that is designed to help Managed Service Providers (MSPs), resellers, and enterprises untangle and manage cost allocation in a multi-tenant implementation. Cost Allocator allows you to re-allocate costs from shared resources and services, by usage, across projects, customers, and departments. This helps ensure accurate invoicing and chargebacks each billing period.
Cost Allocator allows you to easily:
- match shared resources or services from your billing reports
- divide the costs from those resources or services based on usage
- apply the split costs across multiple tag keys and values
This topic will walk you through how to set up the Cost Allocator feature.
Prerequisite
As a first step, you must decide how you want CloudCheckr to apply the tags to your resources. You can use:
- an
ANDstatement if you want CloudCheckr to only apply the tag mapping when a resource meets all the conditions, or - an
ORstatement if you want CloudCheckr to apply the tag mapping when a resource meets at least one of the conditions
By default, CloudCheckr will generate your tag mapping using an AND statement.
Split Tags and Allocate Costs
In this use case, we will show you how to create a tag mapping called Environments.
Next, we will show you how to split the tag mapping based on two conditions: Environment | Production and Environment | Development. Conditions are the details that define your tag splits.
Finally, we will show how you allocate your costs between the two conditions.
Let's create the Environments tag mapping and our two conditions using tag keys and tag values.
- Launch CloudCheckr.
- Select an account from your Accounts List page.
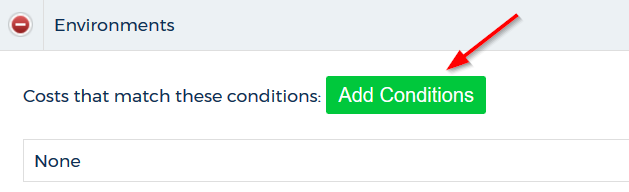
- In CloudCheckr, go to the left navigation pane and choose Cost > Tags (from Detailed Billing) > Cost Allocator.
- On the Cost Allocator page, type the name of your mapping and click Create.
- Find your mapping in the list and click
 to expand and see the mapping details.
 - Click Add Conditions.
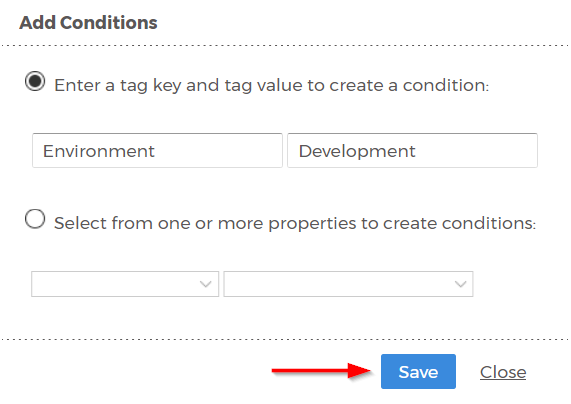
- In the Add Conditions dialog box:
- Select the Enter a tag key and tag value to create a condition radio button.
- In the Tag Key field, type Environment
- In the Tag Value field, type Development
- Click Save.
- Click Add Conditions again.
- In the Add Conditions dialog box:
- Select the Enter a tag key and tag value to create a condition radio button.
- In the Tag Key field, type Environment
- In the Tag Value field, type Production
- Click Save.
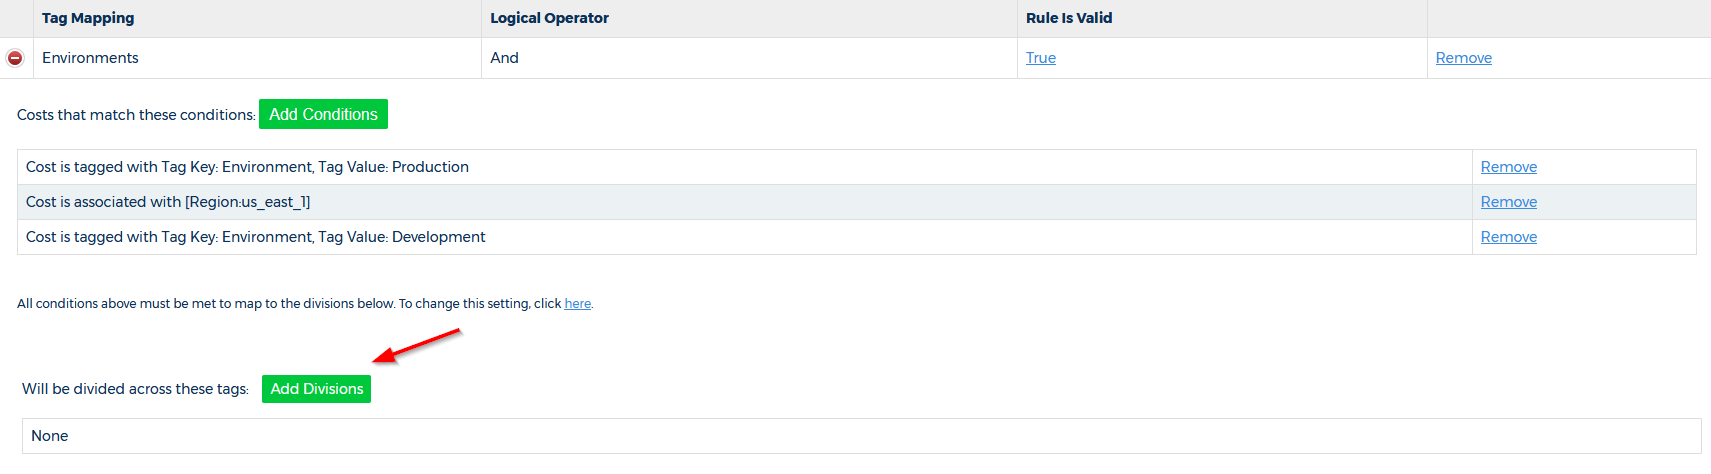
Here is our tag mapping split between the two conditions. The highlighted statement indicates that the default logical operator is
And, which means your tag split must meet both conditions:
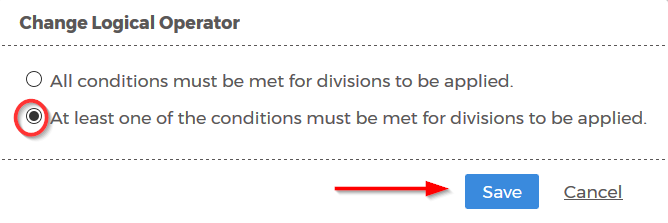
If you do not want to use the default logical operator of
And, you can change it toOrat this time.In our use case, if we changed the logical operator to
Or, CloudCheckr will make the split as long as one of the conditions,Environment| ProductionorEnvironment| Development, is present.To make this change:
- Click the here hyperlink:

- In the Change Logical Operator dialog box, select At least one of the conditions must be met for divisions to be applied.
- Click Save.
You can also create divisions, which means you allocate your costs to each tag split by a percentage. The total percentage must add up to 100%.
In this procedure, we will add a division to our tag mapping, Environments, which we created in Step 1: Create a Condition Using a Tag Key and Tag Value.
- Find your mapping in the list and click
to expand and see the mapping details.
- Click Add Divisions.
The Distribute Costs dialog box opens.
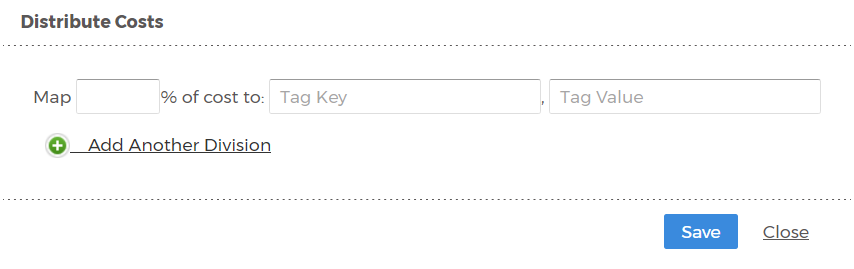
- In the Distribute Costs dialog box:
- In the Map field, type 50
- In the Tag Key field, type Environment
- In the Tag Value field, type Development
- Click
to add another division.
- In the Distribute Costs dialog box:
- In the Map field, type 50
- In the Tag Key field, type Environment
- In the Tag Value field, type Development
-
Click Save.
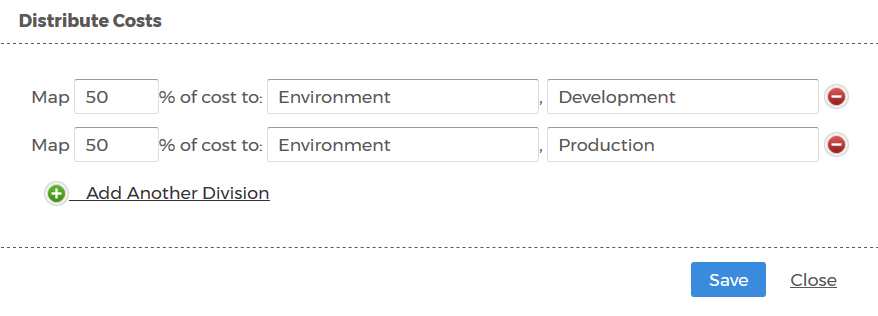
Here is what the completed dialog box looks like according to our use case:
Add a Property (Optional)
You can also add a property—an additional condition that allows you to further limit what costs are included in your AND or OR statements.
In CloudCheckr tag mapping, you cannot apply a property on its own—you must add it to existing conditions created with tag keys and tag values.
In this step, you would repeat Step 1 from the Split Tags and Allocate Costs procedure.
For now, let's just leverage our tag mapping Environments and those splits that we created earlier:

In this step, we will add a property in addition to our conditions, Environment| Production or Environment| Development, to the Environments tag mapping.
- On the Cost Allocator page, find your mapping, and click
to expand and see the mapping details.
- Click Add Conditions.
- In the Add Conditions dialog box, select the Select from one or more properties to create conditions radio button.
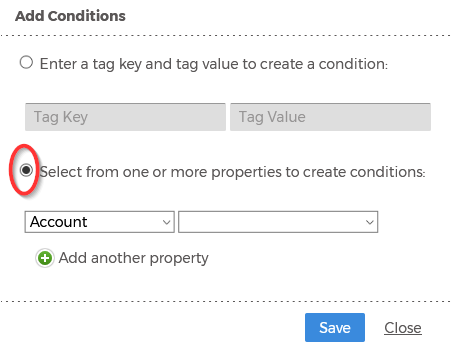
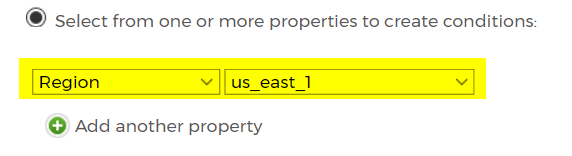
- Select Region from the first drop-down list and select us_east_1 from the second drop-down list.
- Click Save.
Here is what the tagging structure, with the new property, looks like according to our use case:

Let's say that you only want to tag costs associated with the US-EAST-1 region in your previous AND statement.
To add this property: