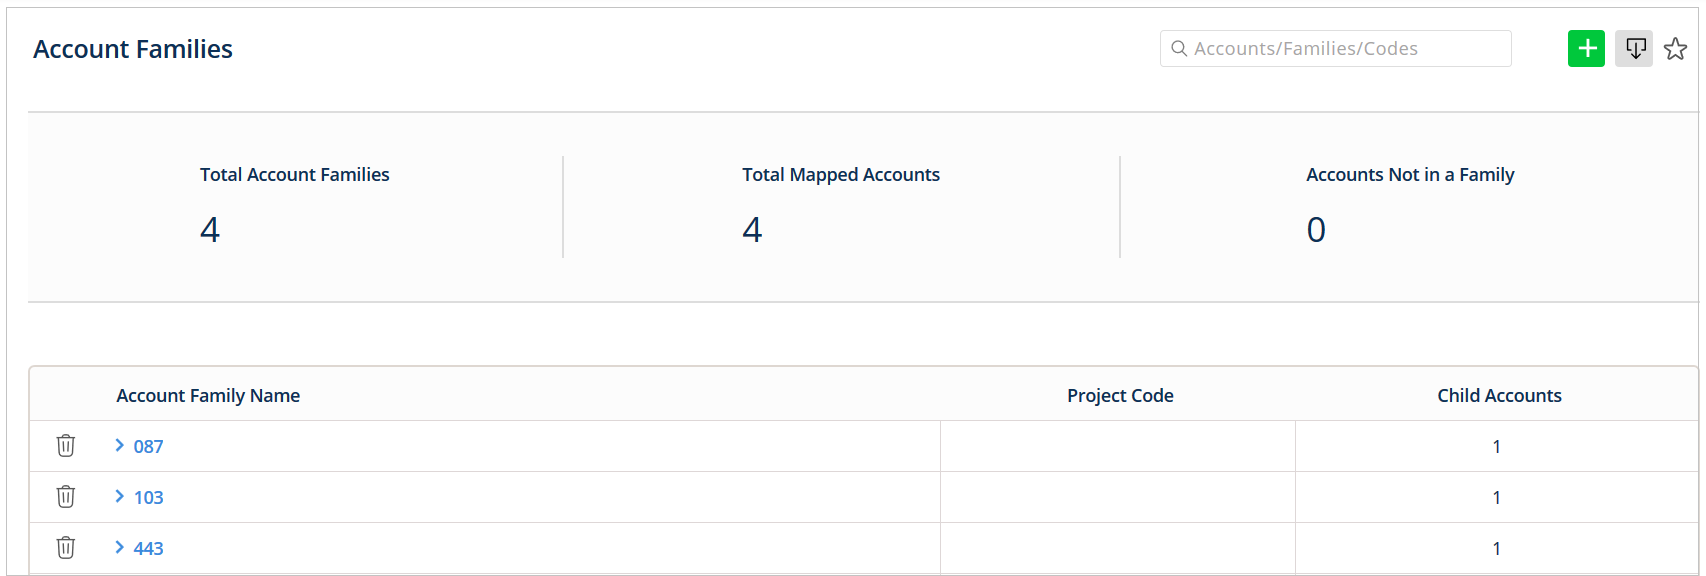
Account Families allow you to group together multiple accounts and treat them as if they were part of a larger group.
With this feature, you can generate reports, assign payment terms, apply custom billing charges, and more across a set of similar accounts with a few clicks of a button.
Before you create an account family, keep these guidelines in mind:
You must have at least one AWS account before you can create an account family in CloudCheckr.
You can create as many account families as your deployment requires.
You cannot add a single AWS account to multiple account families. If you require this configuration, please submit a ticket in the Flexera Community.
This topic shows you how to create and modify an account family.
Procedure
From the left navigation pane, choose Cost > AWS Partner Tools > Configure > Account Families.
The Account Families page opens.
CloudCheckr automatially creates an account family for each AWS account in your consolidated bill, but you can edit or delete them.
Click
(Create).
From the fly-out menu, select Create Account Family.
To create a new account family for an account that is not in an account family, select Create an Account Family for each account without a family.
To add an account manually:
Select Add an account manually.
Type the account number for an existing AWS account.
Select the account family that you want to associate with this account.
Click Add.
Use this option if you have an AWS account that is not included in the Detailed Billing Report (DBR) or the Cost and Usage Report (CUR). CloudCheckr won't add data to these reports for 24 hours after you use the account for the first time.
In the dialog box, provide the following information:
Field
Description
Name
Name of account family
Displays anywhere in the application that references account families
(EX: Invoice Generator)
Email
Email address for account family contact
If using the Scheduled Invoice functionality, the application emails the invoice to this address
Invoice Id
Defined by user
Can modify them in bulk each month
Shows up on any generated invoice
Project Code
Defined by user
Represents an internal tracking number, project name, or chargeback code
Address
Address of customer associated with the account family
Shows up on any generated invoice
Additional Info
Customer-facing notes you can display on the generated invoices
Payment Terms
Two-digit value that represents the payment terms for the account family
Used to create invoices to populate the due date
Overrides the default payment terms generated in the Invoice Generator
Customer must provide a numeric value or leave this field blank
AWS Accounts
Select the AWS account or accounts you want to associate with the account family
Create a Multi-Account View to mirror this Account Family
Select the checkbox to create a Multi-Account View (MAV) that only contains the accounts in the account family
If you delete the account family, CloudCheckr will delete the MAV
Click Save.
CloudCheckr saves the new account family and returns you to the Account Family list.
Click the name of your new account family.
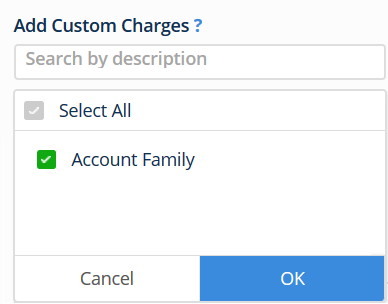
If applicable, scroll down to the Add Custom Charges drop-down menu, and select a custom charge(s) to apply to this account family, and click OK.
Allows you to select custom charges associated with the account family that you created in
Custom Billing Charges
Only displays accounts not in an existing account family
Modify the remaining options in your account family:
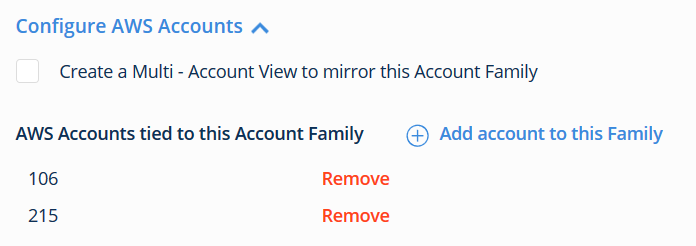
In your new account family, click Configure AWS Accounts.
CloudCheckr displays the AWS accounts associated with your account family:
If you chose to create a MAV, the Create a Multi-Account View to mirror this Account Family checkbox is selected.
Modify your selections if necessary:
Click Remove to remove an account from the account family.
Click Add account to this Family if you want to add an account to the account family.
In your new account family, click Modify Payee Support Charges.
CloudCheckr displays additional options:
Select the support options that best apply to your account configuration.
In your new account family, click Copy Billing Report.
This section shows if you enabled CloudCheckr to copy the charges associated with your account family from your billing report to a designated S3 bucket.
 (Create).
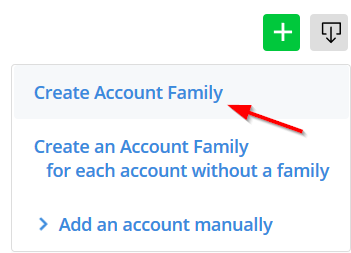


 (Edit) to open the the
Copy Billing Data page.
(Edit) to open the the
Copy Billing Data page.