Analyzing Your Reserved Instance Purchases
Performing an analysis of your Reserved Instance (RI) purchases is key to understanding where your monetary investment went and where it is going in the future. CloudCheckr provides functionality to retrieve all of Amazon's various RI upfront cost metrics and data direct from your Detailed Billing Report (DBR) or the Cost and Usage Report (CUR) and also shows how your costs will affect your deployment. In this topic, we will illustrate how you can leverage the information about your RI purchases using the following CloudCheckr reports:
- Advanced Grouping: find the RI purchase as a line item in your billing data and get details such as description and resource ID
- List of Reserved Instances: a comprehensive list of all your RIs that you can filter and export
- RI Upfront Cost Amortization: track how your RI upfront costs are amortized over time
Using Advanced Grouping to Analyze your RI Purchases
Advanced Grouping is a powerful tool which allows you to search, filter, and pivot the the raw data from your DBR or CUR—which contains gigabytes of monthly data that AWS uses to record your spend.
To access the report, go to the left navigation pane and choose Cost > AWS Billing > Custom Reporting > Advanced Grouping.Finding your RI Purchases
Try searching for your RI purchases, as illustrated in the following example, to help you better understand the grouping and filtering functionality of Advanced Grouping:
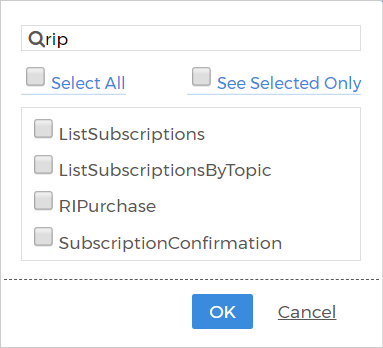
- In the Filters section, click the binoculars icon associated with the Operation filter to view the options. RI purchases are marked with an Operation and Usage Type field to make them easily searchable. You will see that all the available operations are selected by default.
- Deselect the Select All checkbox then in the text box type ripurchase
As you type, the options will automatically populate the list. - When you see RI purchase, select that option, then click OK.
Grouping
Next, we will configure what data is displayed in our results:
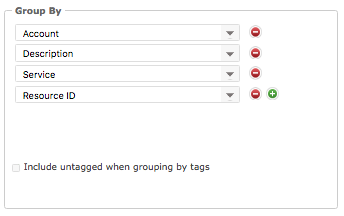
- Go to the Group By section.
By default, this section has one selected group. - Click
 three times to add three more groupings.
 - Change the grouping to match these options:
- Account: groups your results by AWS account number
- Description: lists the AWS description for your item; in this case, the item is the RI purchase
- Service: displays the AWS service for the RI purchase
- Resource ID: displays the resource ID for the item; in this case, it provides the unique identifier for the reserved instance
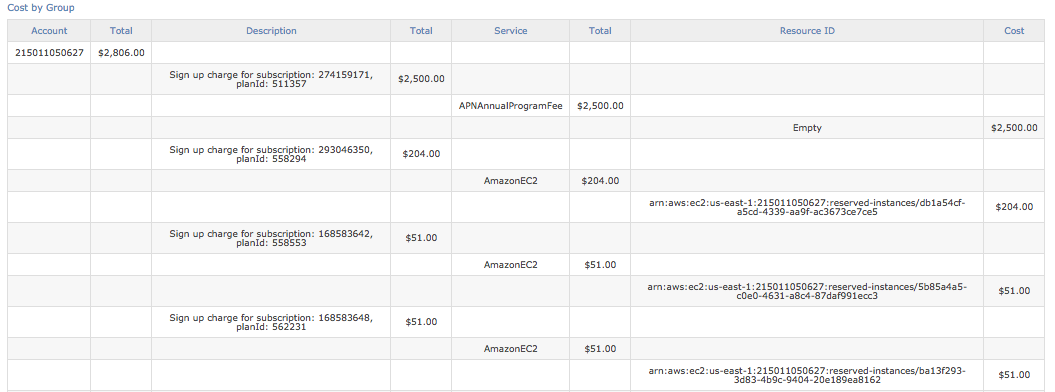
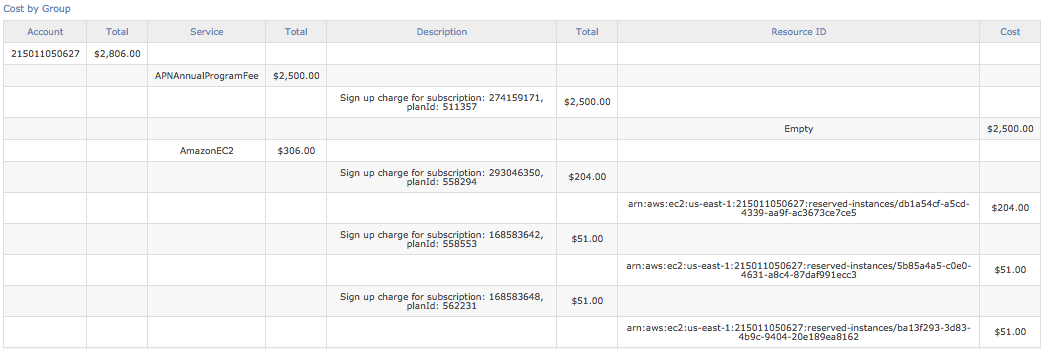
Advanced Grouping arranges your data hierarchically. In the results, you can see that in the account, there is $2,806.00 of cost classified as RI purchases. Of that $2,806.00, $2,500 is for an Amazon Partner Network fee. The other three charges of $204,
$51, and $51 make up the remainder of the RI purchases, and you can see they are for the EC2 service. Advanced Grouping's search functionality is fully customizable. For example, you can also group by Account-Service-Description-Resource ID , which will give you identical cost numbers of the previous but will include results by AWS service.
Using the List of Reserved Instances to Understand Upfront Costs
All of the AWS services that have RIs have a List of Reserved Instances report in CloudCheckr, which provides a daily ledger of all of the RIs in an account and the relevant data. In this example, we will look at the List of EC2 Reserved Instances.
To access this report, go to the left navigation pane and choose Cost > Reserved Usage > Inventory > EC2 > List of Reserved Instances. The screenshot shows an example search: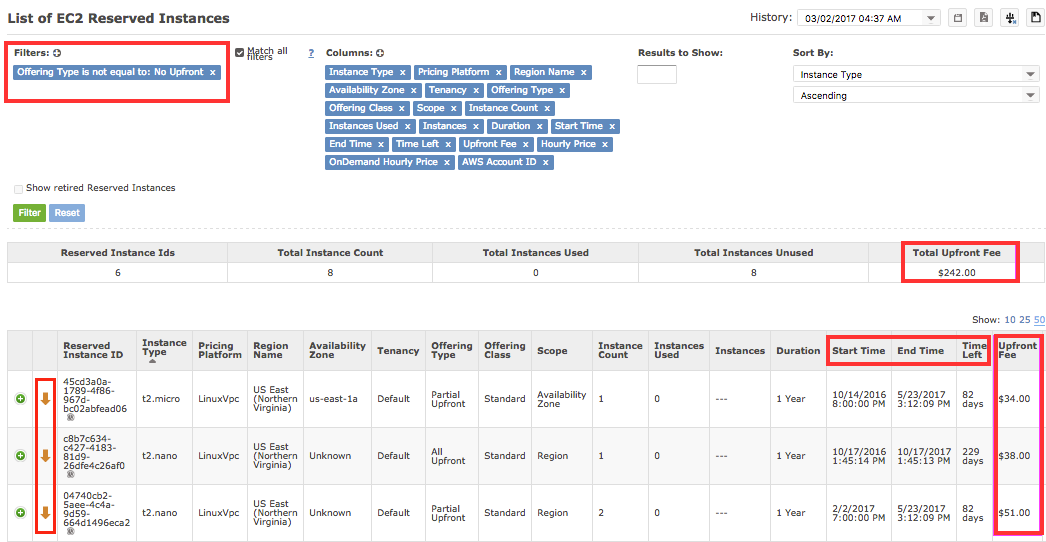
You will see that to show only the RIs that had actual upfront costs, a filter was selected to choose Offering Type is not equal to: No Upfront. We eliminated No Upfront RIs and are left with All Upfront or Partial Upfront.
The arrows marked by the red box indicate that all the filtered RIs are under-utilized—a key piece of information because it indicates that the owner paid the costs upfront, but because they are not using the RIs, they are wasting money. The other items highlighted in red show details around the upfront costs for these under-utilized RIs:- Start Time: when the RI started
- End Time: when the RI will end
- Time Left: the remaining time, in days, on the reservation
- Upfront Fee: the upfront fee for the RI
- Total Upfront Fee: the total upfront fees for all the RIs in your search results
You can refine your search, such as filtering by AWS Account ID, instance type, region, whether the RI is fully utilized or not, or searching for RIs that will end within XX days (such as within the next 30 days).
You can also export the list of RIs to a CSV file, so you can process the data in Microsoft Excel or similar program. By clicking Show retired Reserved Instances, you can choose to see all current and retired RIs used in your deployment.
Amortization of Your RI Upfront Costs
CloudCheckr's RI Upfront Cost Amortization report allows you to understand the lifecycle of your upfront costs.
To access the report, go to the left navigation pane and choose Cost > Reserved Usage > Amortization.
The report allows you to track upfront cost amortization for EC2, Elasticache, RDS, and Redshift.
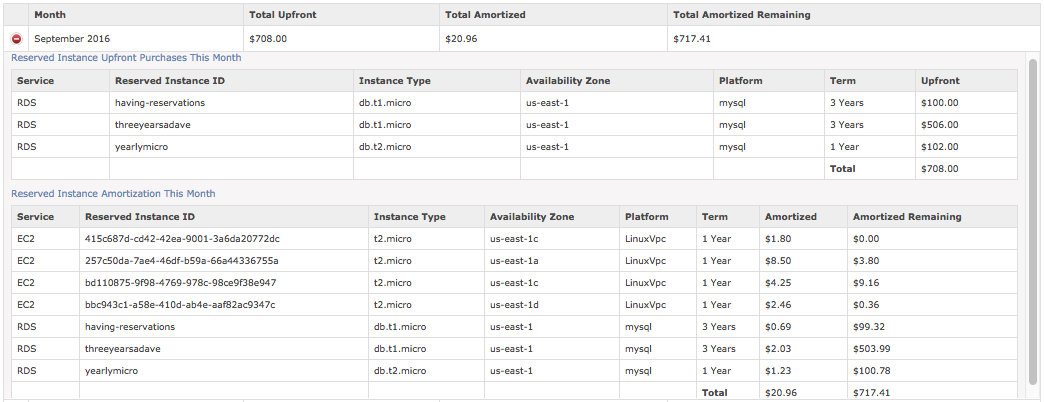
The monthly breakdown shows you all relevant details about your amortized upfront costs:
- all RI upfront purchases, type, and cost
- how the RI was amortized, how much went into the amortized cost in the month, and how much remains