Configure CloudCheckr CMx API
CloudCheckr CMx provides customers with a brand-new scalable API platform that leverages the Swagger interface and technology.
This API platform uses OAuth 2.0, an open authorization protocol that enable you to access resources using username and password tokens rather than credentials.
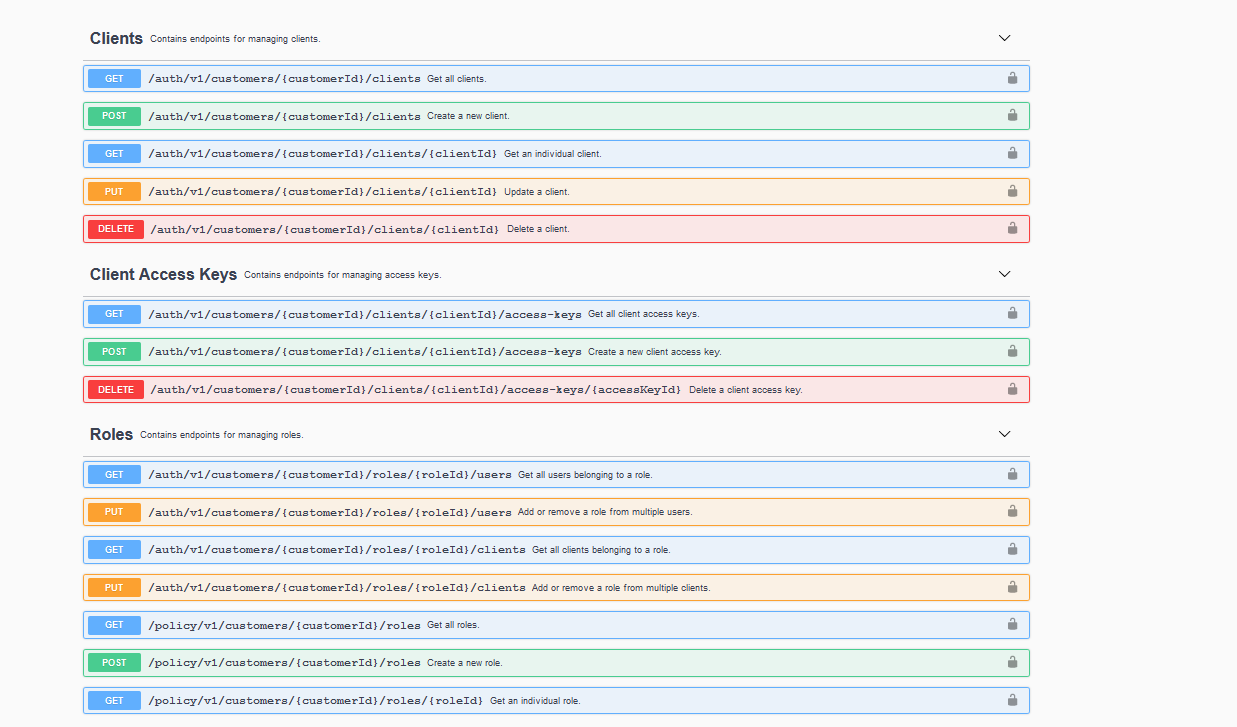
The CloudCheckr CMx API categorizes the API calls by resource. In this example, you can see how the API calls or endpoints are associated with each resource:
This topic provides a workflow that shows you how to perform an API call in this new platform.
Workflow
Click the drop-down boxes to review and follow each step in this workflow:
This procedure shows you how to create a new client that you can use to query the CloudCheckr API.
- Launch CloudCheckr CMx.
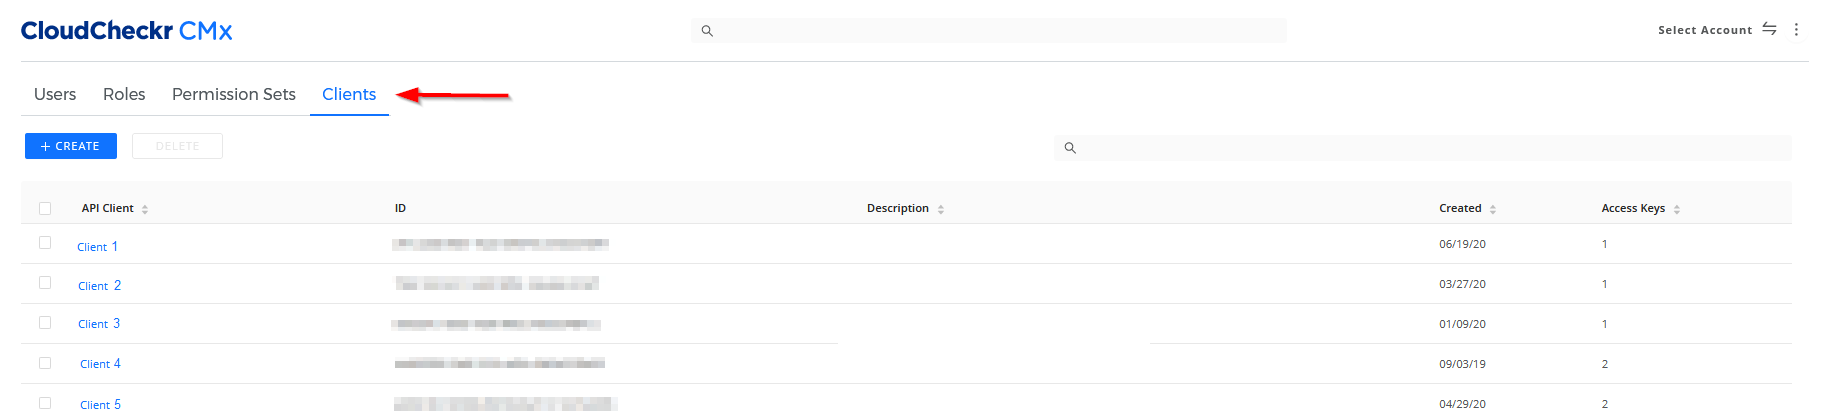
- Click the Settings icon and select Access Management > API Management.
CloudCheckr CMx displays the Access Management page. The Clients tab is selected by default:
- Click the + CREATE button.
- Type a name for the client.
- From the Client Role(s) drop-down list, select the roles you want to assign to the client.You can only assign up to 10 roles for each client.
- Type any helpful personal and/or organizational notes if applicable.
Here is an example of what the screen may look like if you created a client with the User and Client Access Management role, which allows you to query the CloudCheckr API to retrieve Production cost data:
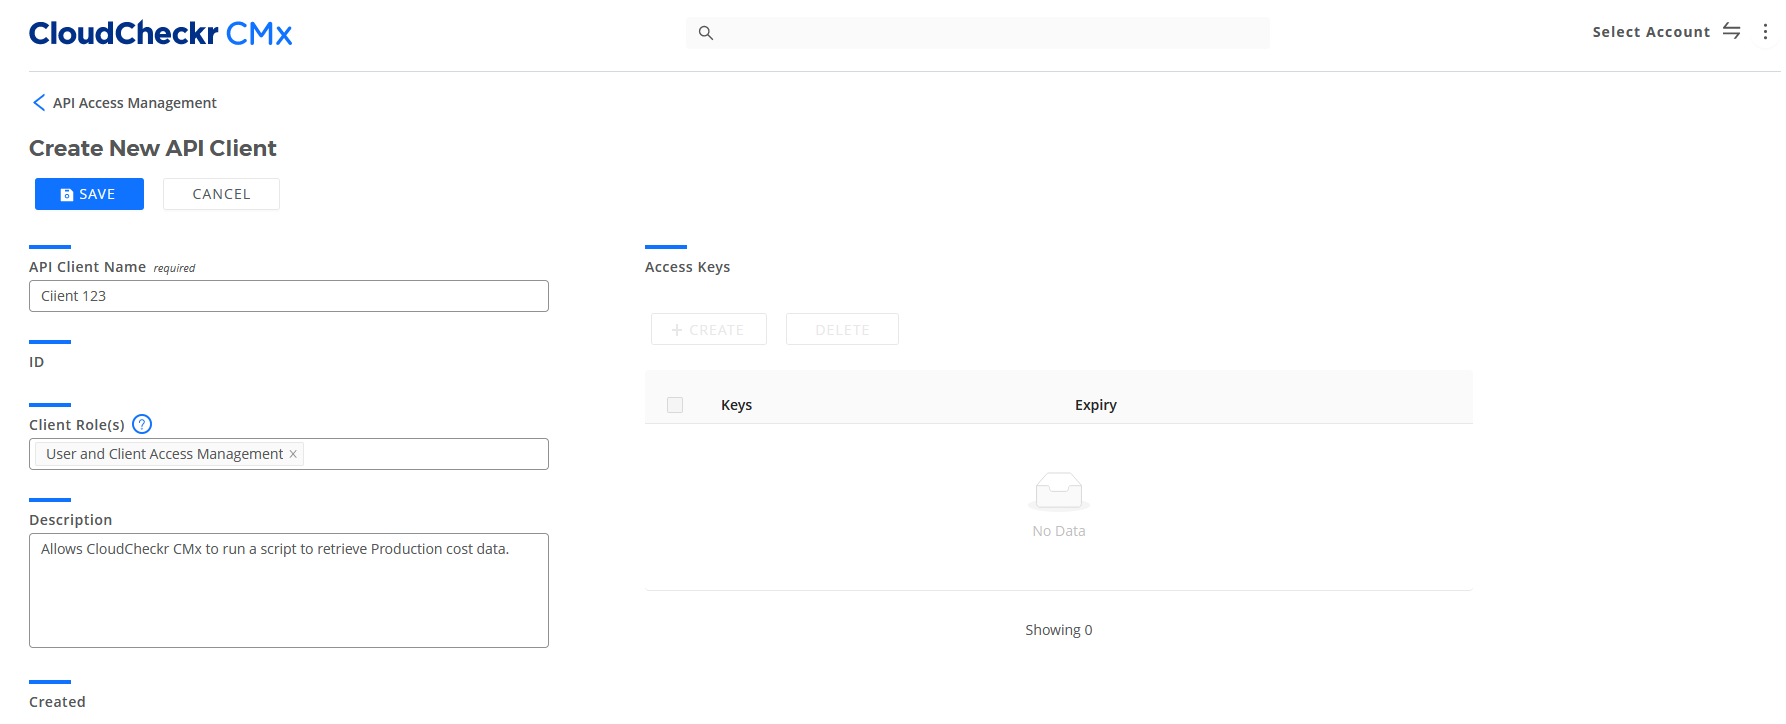
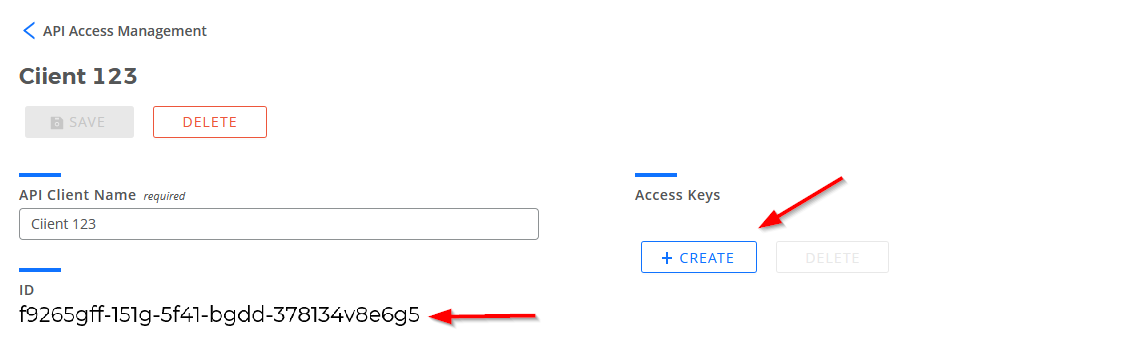
CloudCheckr CMx saves the client, generates a unique Client ID for that client, and enables the + CREATE button under the Access Keys section:
This procedure shows you how to create an access key, which is required to make a call to the CloudCheckr API.
The access key is equivalent to the client secret referred to in many OAuth 2.0 articles.
- Under the Access Keys section, click the + CREATE button.
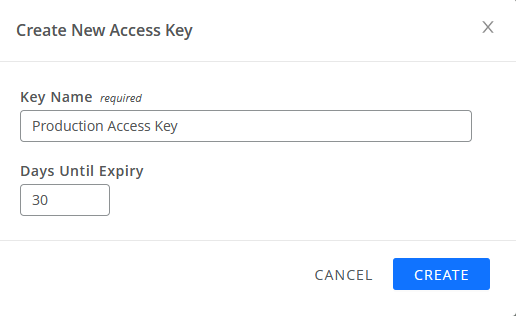
- In the Create New Access Key dialog box, type a name for the access key.
- Click the
 and
and  arrows or type a number that identifies the number of days you can use the access key before it expires.
Here is an example of what the screen may look like if you created an access key for the Production environment with a 30-day expiration date:
- Click CREATE.
A pop-up indicates that CloudCheckr CMx created your access key:
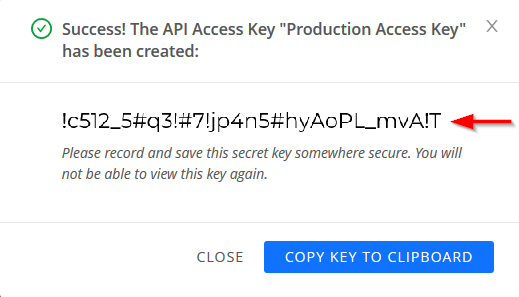
- Copy and save the Access Key to a secure and easily accessible location.
You will need to use it in Step 3: Generate a Bearer Token.
- Click COPY KEY TO CLIPBOARD.
- Click CLOSE.
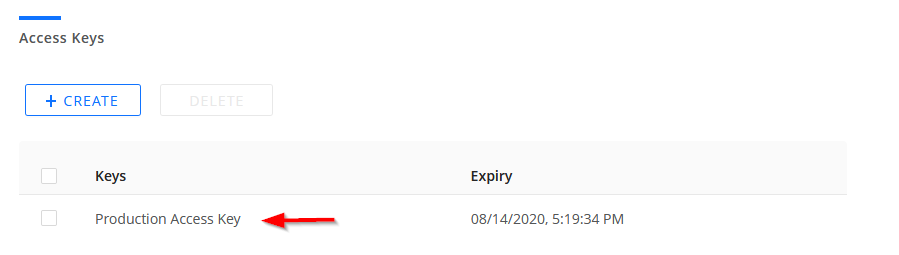
CloudCheckr CMx displays the new access key/client secret in the Keys list:
You will use the Client ID and the access key (client secret) to generate a bearer token—the critical piece of data that all future API 2.0 calls will use for authentication.
Follow these steps to generate the bearer token:
- Identify the Auth URL based on which platform you use to access CloudCheckr CMx:
Platform
Authorization URL
PROD (US)
https://auth-us.cloudcheckr.com
PROD (GovCloud)
https://auth-gov.cloudcheckr.com
PROD (Europe)
https://auth-eu.cloudcheckr.com
PROD (Australia)
https://auth-au.cloudcheckr.com
- Append
/auth/connect/tokento the end of your Auth URL.For example, here is what the full token URL looks like if you work in the US PROD platform:
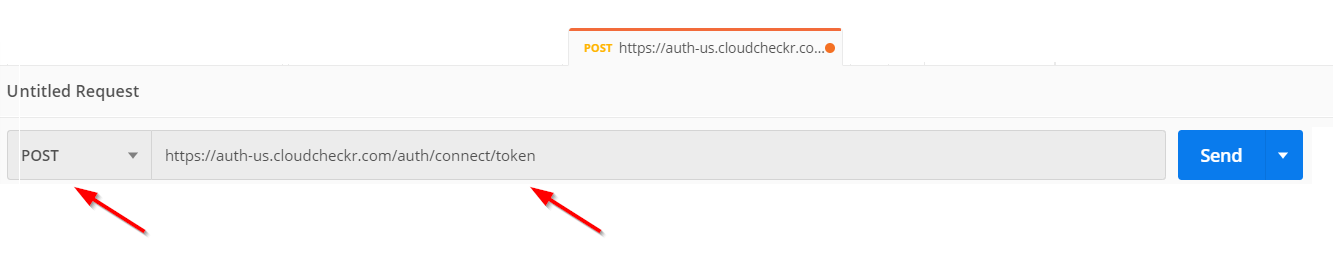
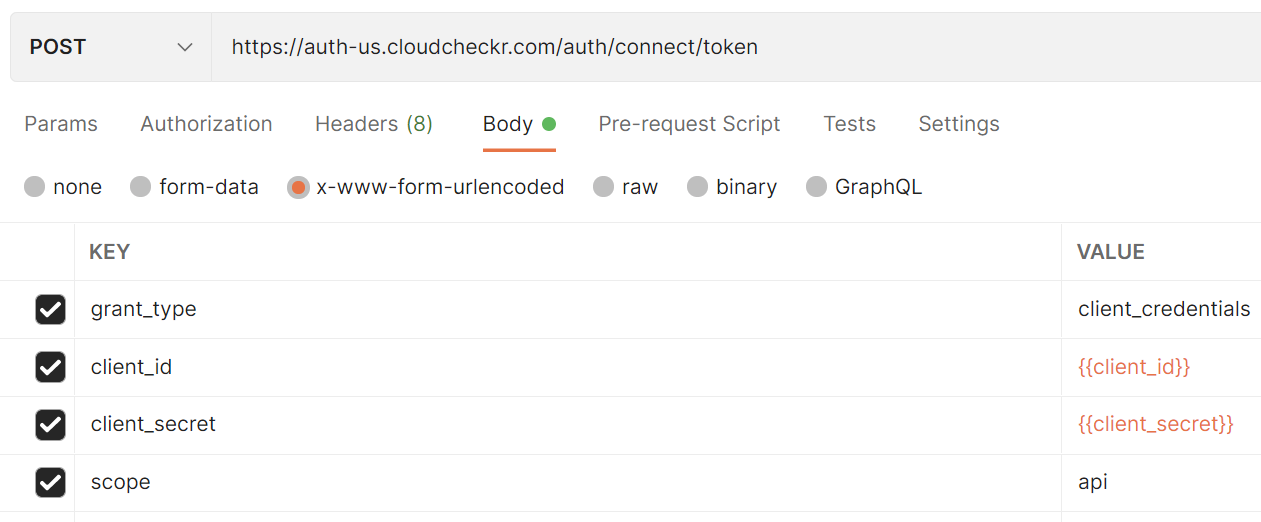
https://auth-us.cloudcheckr.com/auth/connect/token - Launch Postman.
- Select POST as your request type and provide the full token URL in the top blank field:
- Click the Body tab and select x-www-form-urlencoded radio button (see screenshot below).
- Type the following information into the KEY and VALUE fields:
KEY
VALUE
grant_type
client_credentials
client_id
the unique Client ID you created in Step 1: Create a New Client
client_secret
the unique access key you created in Step 2: Create an Access Key
scope
the range of access you are requesting; for this procedure, we will use api
Here is an example of what the Postman data looks like using the values from this procedure:
- Click Send.
Your Postman response should look like this:
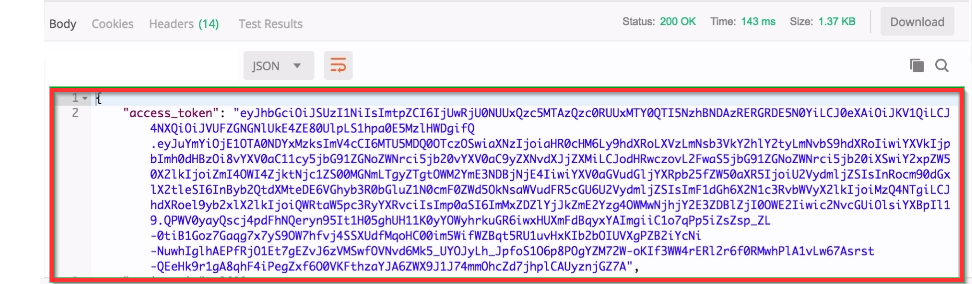 If you get an error in your response, see the Troubleshoot a 400 Bad Request section.
 - Copy the bearer token to a safe and easily accessible location. You will need it in Step 4: Get the Customer ID.
The Customer ID is a system-level identifier that is unique to every customer and is required to perform API calls.
The Customer ID is the number after /customers/ in the URL in the CloudCheckr CMx UI:

For this procedure, we will show you how to generate a response for the CMx API call, Create User:
- Verify that you have the following items before you perform the call:
Item
Description
Bearer token
the value that CMx API calls use for authentication you generated in Step 3: Generate a Bearer Token
Customer ID
the unique customer identifier you created in Step 4: Get the Customer ID
Role ID
the unique role identifier you can retrieve using the Get All Roles CMx API call
Email address
the email address you want to associate with the new user
- In Postman, select POST as your request type.
- Type the full Create User URL in the top blank field.
For this procedure, we will use
https://api-us.cloudcheckr.com/auth/v1/customers/34858/users - Click the Headers tab.
- Provide the following information in the KEY and VALUE fields:
KEY
VALUE
Authorization
type the word Bearer, press the Space bar, and type the bearer token from Step 3: Get Bearer Token.
Content-Type
application/json
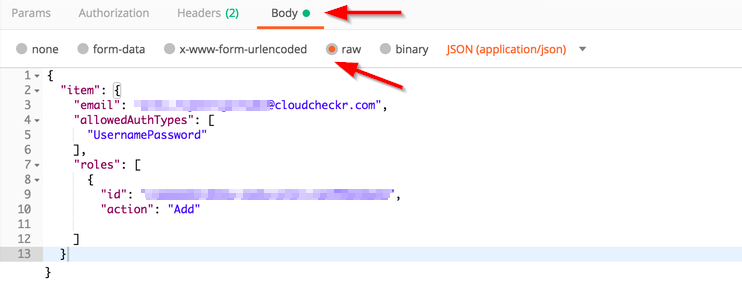
- Click Body and select the Raw radio button.
- Paste the JSON data object for Create User API call:
Here is an example of what the Postman data may look like using the values from this procedure:
Here is what the request would look like in CURL:
{

             "item": {

                "email": "john.brown@cloudcheckr.com",

                "allowedAuthTypes": [

                   "UsernamePassword"

                ],

                "roles": [

                   {

                      "id": "d5ddda18-756b-4f9g-bc52-d5f705610e88",

                      "action": "Add"

                   }

                ]

} - Click Send.
Your Postman response should look like this:

Here is what the response would look like in CURL:
{

             "id":"f78944e4-693a-4796-a1b7-0e0d4fb9ac4a",

             "customerId":"34858",

             "roles":[

                {

                   "id":"d5ddda18-756b-4f9g-bc52-d5f705610e88",

                   "name":"CMxRole"

                }

             ],

             "email":"john.brown@cloudcheckr.com",

             "allowedAuthTypes":[

                "UsernamePassword"

             ],

             "createdDate":"2020-05-25T23:32:55.5175148Z",

             "isActivated":false

          }
Additional Actions
Click the drop-down boxes to learn how to perform other actions in the CMx API:
If you get this error message when you attempt to generate a bearer token, use a form type to create a CURL request, and make sure to type each value as a separate form:
curl -- request POST \

               -- url https://auth-us.cloudcheckr.com/auth/connect/token \

               -- header 'Postman-Token: aeeafd69-b974-4645-a18d-093ddcc5e9f3' \

               -- header 'cache-control: no-cache' \

               -- header 'content-type: multipart/form-data; boundary=----WebKitFormBoundary7MA4YWxkTrZu0gW' \

               -- form grant_type=client_credentials \

               -- form client_id=client_id \

               -- form 'client_secret=client_secret \

               -- form scope=api
Here is what the response would look like in JSON:
{

              "access_token":"eyJhbGciOiJSUzI1NiIsImtpZCI6IjUwRjU0NUUxQzc5MTAzQzc0RUUxMTY0QTI5NzhBNDAzRERGRDE5N0YiLCJ0eXAiOiJKV1QiLCJ4NXQiOiJVUFZGNGNlUkE4ZE80UlpLS1hpa0E5MzlHWDgifQ.eyJuYmYiOjE1OTA0NDY2MjAsImV4cCI6MTU5MDQ1MDIyMCwiaXNzIjoiaHR0cHM6Ly9hdXRoLXVzLmNsb3VkY2hlY2tyLmNvbS9hdXRoIiwiYXVkIjpbImh0dHBzOi8vYXV0aC11cy5jbG91ZGNoZWNrci5jb20vYXV0thisisfakebG91ZGNoZWNrci5jb20iXSwiY2xpZW50X2lkIjoiZmI4OWI4ZjktNjc1ZS00MGNmLTgyZTgtOWM2YmE3NDBjNjE4IiwiYXV0aGVudGljYXRpb25fZW50aXR5IjoiU2VydmljZSIsInRocm90dGxlX2tleSI6InByb2QtdXMteDE6VGhyb3R0bGluZ1N0cmF0ZWd5OkNsaWVudFR5cGU6U2VydmljZSIsImF1dGh6X2N1c3RvbWVyX2lkIjoiMzQ4NTgiLCJhdXRoel9yb2xlX2lkIjoiQWRtaW5pc3RyYXRvciIsImp0aSI6ImJiYmM4NzFhZGQyOTVmNWY5M2IwODk0NDE3NDthisisfakeUsngYfsIh78ToAPx-Yi7q3dF_t6uQsSujebWHIAR-xMjBTpWnyDtRBBcC-bFBI3y4GFjcWbDldIupG722Lg8GI584zaoLsRLt6L9VkCZMW9Zz9gqnNeMFcABTLA4F61R8DJp_-QUjCVL6Are0fTaZksRe7cA4iwlnZaxocf8zJuzirnpIUu-khVl78HRR2awrhnix45UL0WhDTSKVhN0MzruwEy9JPwGgGXD7xyB2CQvf3uoHaAiCmdPNz0nQBGBRMJX6MEQj390n4yNKueoZDzXhQaZ8SoTzB0MpFrr8coyqtmbdQKVGsP4nPLclOHAkFlb7T_aA0QygvkJVAMw",

          "expires_in": 3600,

          "token_type": "Bearer"

}This procedure shows you how to run the Get Token Info API call to generate the bearer token:
- Launch Postman.
- Select GET as your request type.
- Type the full token URL in the top blank field.
For this procedure, we will use
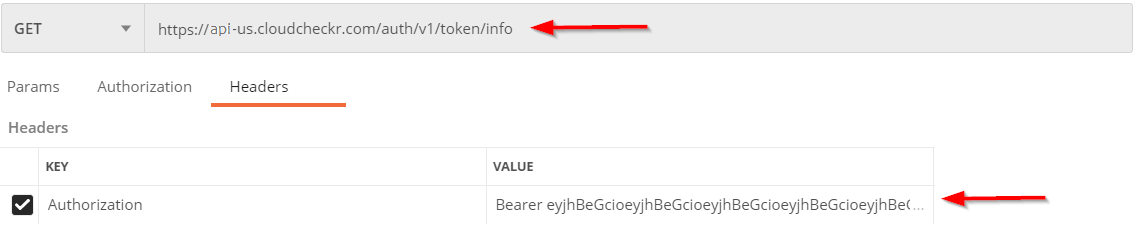
https://auth-us.cloudcheckr.com/auth/v1/token/info. - Click the Headers tab.
- De-select any headers for Authorization.
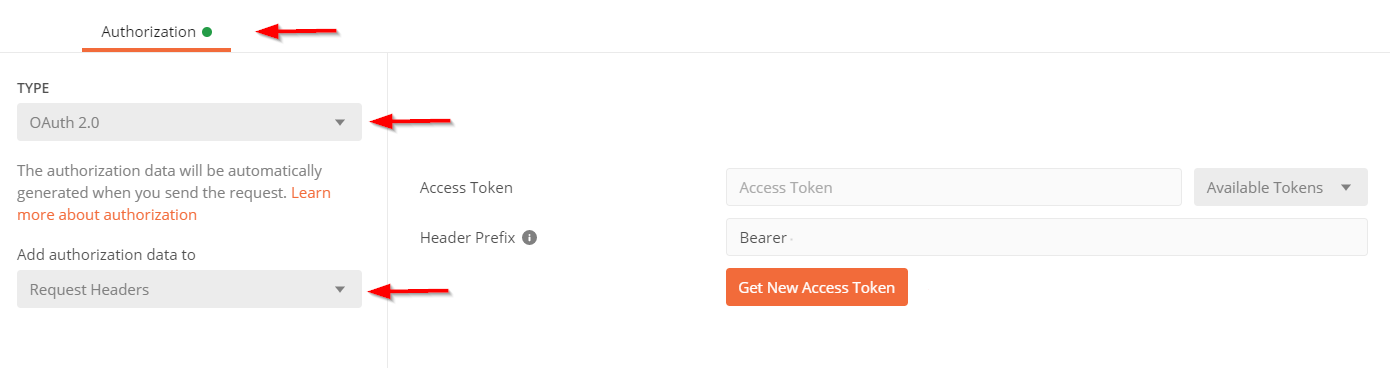
- Click the Authorization tab, and perform the following actions:
- Under the Type drop-down menu, select OAuth 2.0.
- Under the Add authorization data to drop-down menu, select Request Headers.
Your input should look like this:
- Click the Get New Access Token button.
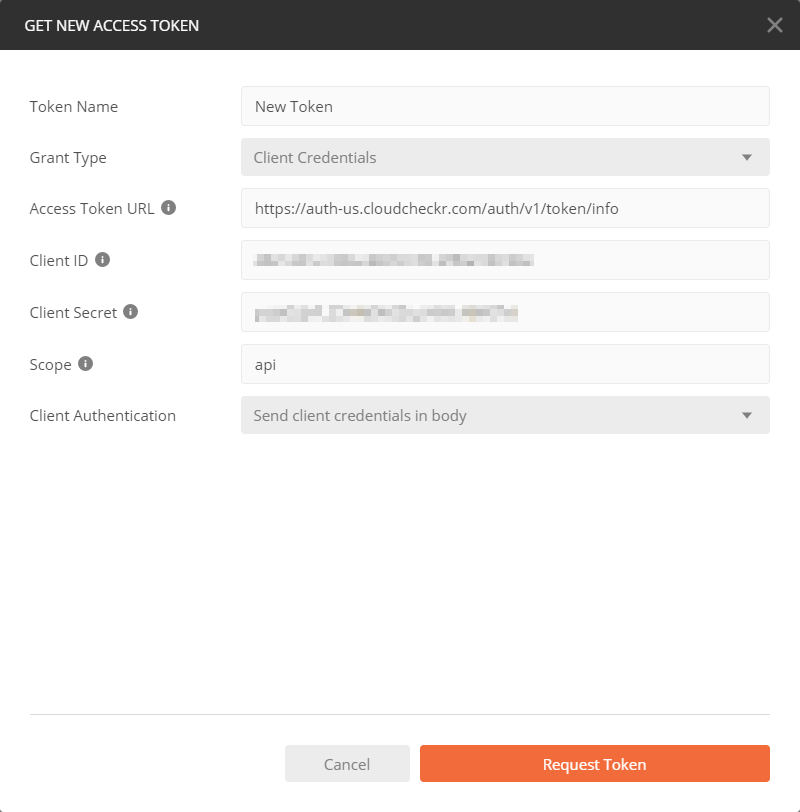
- In the GET NEW ACCESS TOKEN dialog box:
- Type a name for your token.
- From the Grant Type drop-down menu, select Client Credentials.
- Paste the Client ID that you created in Step 1: Create a New Client.
- Paste the Client Secret that you created in Step 2: Create an Access Key.
- In the Scope text field, type api.
- From the Client Authentication drop-down menu, select Send client credentials in body.
Your populated dialog box should look like this:
- Click Request Token.
- In the MANAGE ACCESS TOKENS dialog box, click Use Token.
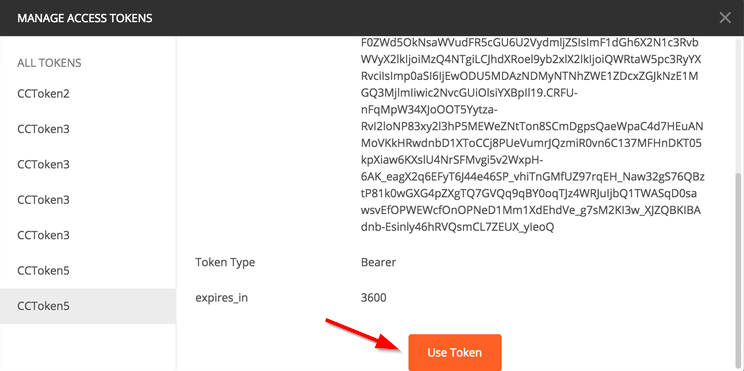
Postman will automatically populate the Header with the new token.
This procedure shows you how to use an automation script to generate the bearer token:
- Launch Postman.
- Select GET as your request type.
- Type the full token URL in the top blank field.
For this procedure, we will use
https://api-us.cloudcheckr.com/auth/v1/token/info. - Click the Headers tab.
- In the KEY text field, type Authorization.
- In the VALUE text field, type Bearer and press the Space Bar.
- Immediately after the space, paste the token value you generated in Step 3: Generate a Bearer Token.
Here is an example of what the Postman request looks like using the values from this procedure:
- Click Send.
Your Postman response, which includes the Customer ID, should look like this:
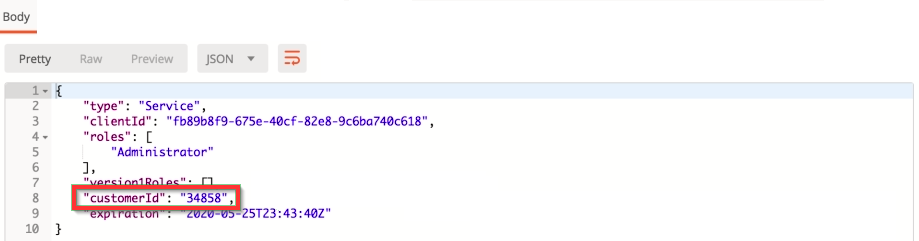
Here is what the response would look like in CURL:
{

              "type": "Service",

              "clientId": "ec97c6e8-776a-51dg-93f9-8d7bx732c518",

              "roles": [

                  "Administrator"

              ],

              "version1Roles": [],

              "customerId": "34858",

              "expiration": "2020-05-25T23:43:40Z"

          }