Generate Invoices
The CloudCheckr Invoice Generator allows consolidated accounts to create customized invoices for each of their customers. The costs that CloudCheckr uses to build the invoice are taken directly from the AWS Detailed Billing Reports, for whichever time period the invoice is generated against. The invoice generator is only visible from within a Consolidated Payer Account, and is never visible within Payee Accounts at all.
All Invoice Generator functions are split across three tabs: Create Invoice, Scheduled Invoices, and Historical Invoices.
To access this feature, go to the left navigation pane and choose Billing >Report > Generate Invoices.
Custom Charges
The Create Invoice tab will give you control over creating and editing the customers which you can then create invoices for. This page allows you to create and edit details for each invoice. For more information, review the Custom Billing Charges.
The CloudCheckr invoice generator also gives you the ability to add custom charges to your invoices.
CloudCheckr allows you to add two different types of charges to an invoice, percentages and fixed charges. Fixed type charges are constant as the specified value while Percent type charges are based on a percentage of the charges on the invoice.
Also required is a description of the charge, which will be added to the invoice, depending on which format you select. You also will need to add a date for the charge. The date you select will reflect which invoice the charge will appear on. For example, if you set the charge with a date of 5/15/2020 and then generate an invoice for June, the charge will not appear on the invoice. Alternatively, you can select Recurring which will apply the charge monthly to every invoice generated after the date specified. When you have added your charge information, select Save and the Close to bring you back to the setup customer page.
Suppressing Charges
If you wish to suppress a specific charge for one of your customers, you can do so from the Setup Customers tab. Selecting the Search Charges button will allow you to view all of the charges associated with the accounts tied to a customer.
You can choose to suppress charges for a single invoice, or for all future invoices. This selection can be edited at any time and charges can be reinstated from the Setup Customer tab whenever you need. After you have selected the charges you wish to suppress, selecting close will bring you back to the setup customer view.
Apply AWS Credits
We have included the ability to directly add AWS credits which are applied to the payer, to your payees in the invoice generator. In order to do this click on Apply AWS Credits, select your month and filter.
Select apply and then choose whether you want to apply the total credit or part of the credit.
Select save and the credit will be applied to that customers invoice.
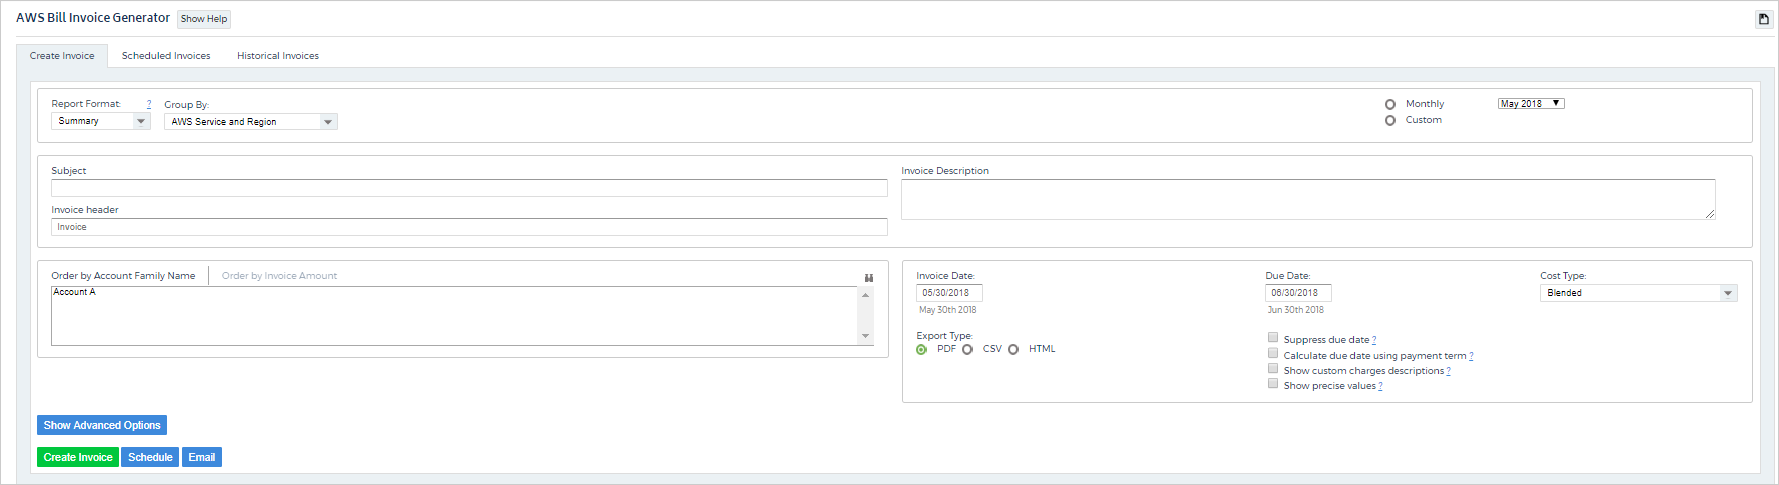
Create Invoice
The Create Invoice tab will allow you to generate the invoices for your customers. From this screen we provide you with many options.
- Summary: shows costs broken out by EC2 service and region. This option is the most concise of all of the invoice formats.
- Detailed Description: This option will show you a summary table at the top which breaks out cost by service. Below shows the costs broken out by service, region and then the detailed description of that service as well as an explanation of what the charge is for. This is the most detailed format CloudCheckr offers.
- Detailed Condensed: This report format shows you similar information to Detailed Description, only it lacks the explanation of the service.
- Detailed Operation: This report format breaks the costs down by service, region and operation. It gives you the name of the operation and the charge associated with it.
After you have selected the appropriate report format, you will need to select the date information for the invoice. This includes the due date, the date of the invoice as well as the dates the invoice covers.
You also need to select which export format you would like the invoice to be. We offer the option for creating a PDF, CSV, and HTML files.
Advanced Options
The Advanced Options section on the Create Invoice tab allows you to do a variety of things. the first feature is the currency converter. We allow users to enter a currency and exchange rate of their choosing. This is then applied to the totals on the invoice. Also included is the ability to filter by tag. If you want to filter charges by a specific tag simply select the tag from the dropdown menu.
Alternatively you can choose to schedule the invoice for a later date. If you wish to automatically schedule an invoice to be delivered monthly on a specific day, select the schedule button.
Select the day of the month you would like the invoice sent and the email address which you wish to have the email address sent to. You can edit and see the details of your scheduled invoices on the Scheduled Invoices tab. This tab allows you to see any invoices you currently have scheduled to be delivered to users. From this screen we show you the format, cost type, CC email address, and the date that the next invoice is scheduled to be sent. You also have the ability to edit or delete this invoice.