Account-Level Tags in Core CloudCheckr
Account-level tags are attributes that you assign to your core CloudCheckr accounts which you use to configure your Multi-Account Views (MAVs).
MAVs allow you to examine large amounts of data for resources from multiple accounts in a single view— giving you insight on how accounts with similar attributes are performing in your deployment.
For example, if you want to view all the accounts in your Sales department that use your Production environment, you would create the Sales and Production account-level tags and assign them to the accounts that you want to appear in that MAV.
Procedure
Follow this procedure to see how to create and assign account-level tags in the core CloudCheckr application:
-
From the left navigation pane, choose Account Settings > Account-Level Tags.
The Account-Level Tags page opens.

- Scroll down to the bottom of the page and click the Or create a new tag link.
- In the dialog box, type a name for your tag in the Key text field and click Create.
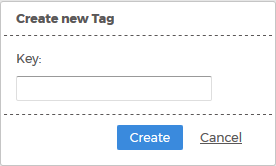
For the purposes of this procedure, let's say we created the Production tag to identify the accounts in our Production environment.
The Production tag is displayed in the list. Notice that it's selected by default:
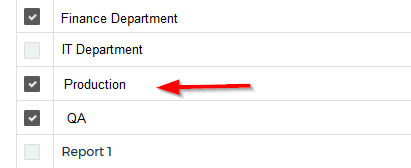
- Click the checkbox next to other tags you want to assign to your account.
If you don't want a tag associated with a selected account, click to de-selected the checkbox.
- Click Save.